Running your own server
Required
- Java (versions 8-14 are known to work)
- Open JDK (v8, v11, v13 and v14 are known to work):
- Go to https://adoptopenjdk.net/ and click Other Platforms.
- Select OpenJDK 8, 11, 13 or 14 for Version (JVM - HotSpot). Download the package that fits your OS/architecture.
- Open the downloaded file and go through the setup, accepting defaults for everything. Just keep clicking Next until it is finished.
- A GitHub account.
- Git
- The Open RSC Code code repository.
- Open a terminal.
- Move to the directory you wish to download the repository to (i.e.
cd [folder]) and entergit clone [repository URL].git. It may take a few minutes to download.
- Apache Ant - scroll down and you should see versioned releases; just download the latest
.zipfile. - MariaDB (Server) if you plan to use MySQL instead of SQLite (see section below for help deciding which path to take).
- HeidiSQL (or another MySQL client) for querying and updating game data, regardless of which path (MySQL / SQLite) you take.
Recommended
- IntelliJ for working in the
Core-Frameworkrepository.- Visual Studio Code as an alternative Java IDE
- RSC+, if you want a nicer client to connect to your server with.
Before You Start: MySQL vs SQLite
In the connections.conf file of the Open RSC codebase ("Core-Framework") you will find a db_type setting. By default, this is set to sqlite, which makes setup slightly easier in that you don't have to set up the game database yourself. Previously, the default was mysql, and you were required to run database scripts in order to create the necessary tables for the game to run. While SQLite will definitely get you up and running slightly faster, it will also make it slightly harder to query and update your data. Regardless of which one you pick, this guide will help you through the steps necessary to get your server running.
Setting Up a Server
- Choose a database type. Open the
connections.conffile and either keep the default,sqlite, or change this tomysql. Save the file. - [MySQL] If you chose MySQL database type, run the MariaDB setup.
- On the Custom Setup screen, click Next.
- On the Default instance properties screen, it will ask you to enter a password for the root user. we suggest entering root if this is your first setup/server. If/when you decide to make your server public, you should update the password to make the database more secure.
- Finish setup by clicking Next or Install on subsequent screens.
- Install Apache Ant.
- Extract the contents of the
.zipto your computer. If on Windows,C:\Program Filesis recommended. - Add a new environment variable on your computer named
ANT_HOMEand for the value, enter the path to theapache-ant-X.X.XXfolder without trailing slashes.- If you are on Windows, you will need to add it to both User variables and System variables.
- Edit your computer's
Pathenvironment variable by adding the path to the Apache Ant bin folder (i.e.C:\Program Files\apache-ant-X.X.XX\bin). - To confirm Apache Ant is working, open a new terminal and simply enter
ant. You should get an error:Buildfile: build.xml does not exist!– this means you installed it correctly.
- Extract the contents of the
- Install HeidiSQL.
- The HeidiSQL setup is typical, just keep clicking Next until it’s finished.
- [MySQL] If you chose the MySQL database type, below are instructions for setting up the database:
- Start HeidiSQL. You will have to create a session (a database connection). Your settings should look something like the screenshot below. For Password, enter the root user password you specified in the MariaDB setup (usually
root).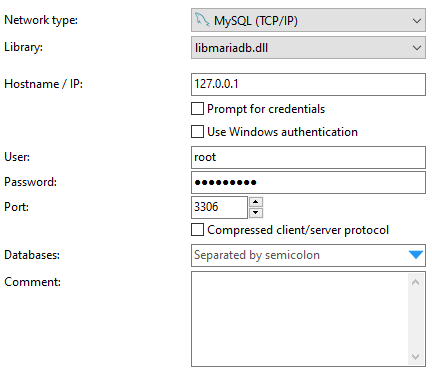
- Save the settings, then Open the session you created.
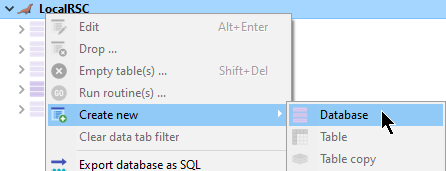
- Right click your instance name and select Create new -> Database.
- Enter the name
preservation(or, if you want to be able to name this whatever you want, just change thedb_namesetting in thedefault.conffile) and click OK. - Open the
Core-Framework/Databases/core.sqlfile in a text editor and copy the contents of the file. - In HeidiSQL, click Query -> New query tab and type
USE preservation;on the first line (or replacepreservationwith your database name if you gave it a different one). Then on the next line, paste the contents of thecore.sqlfile. - Click the blue play button
 to execute the script (or press F9). You will get some warnings (~29), but that is normal.
 - Expand your new database and make sure it has tables under it, like
bank,chat_logs,players, etc.
- Start HeidiSQL. You will have to create a session (a database connection). Your settings should look something like the screenshot below. For Password, enter the root user password you specified in the MariaDB setup (usually
- Compile the server and client using Apache Ant.
- Server: Open a terminal,
cdintoCore-Framework/serverand runant compile-and-run. It will take around 30 seconds to finish. When you seeGame world is now online on portal 43594!orRunescape started in XXXXms, then the server is now running. - Client: In another terminal,
cdinto theCore-Framework/Client_Basefolder and runant compile-and-run. This should create theClient_Base/Open_RSC_Client.jarfile and start the client.
- Server: Open a terminal,
- If at this point, you are experiencing issues with compiling the server and/or the client (getting errors), please check the Troubleshooting section below.
- To make your character an admin:
- [SQLite] If you are using SQLite, you will first need to open the SQLite
.dbfile using HeidiSQL:- Open HeidiSQL. In Session manager, click the green + New button to create a new session. Name it however you'd like.
- For Network type, select SQLite (Experimental).
- For Database filename(s) (3rd field down), click the blue down arrow and click Find database files.... Select your
.dbfile (which by default, are located inserver/inc/sqlitein theCore-Frameworkcodebase). - Click Open. You should now be able to query and manipulate (i.e. edit) your game server's data using HeidiSQL.
- In HeidiSQL, run the following query (i.e. via Query -> New query tab):
SELECT * FROM preservation.players; - Note the
idof your character (your first one will have anidof 1), then run this command:UPDATE preservation.players SET group_id = 0 WHERE id = your id;
- [SQLite] If you are using SQLite, you will first need to open the SQLite
- Now that you've gotten the whole thing running, it's time to configure your server.
- It is recommended to make a copy of a premade
server/*.conffile (i.e.server/default.conffor preservation-style servers) and name itlocal.conf. This way, you can change whatever game settings you like without affecting the codebase. Iflocal.confexists, that file will always overridedefault.conf. - In
local.conf(ordefault.confif you chose not to make a local config file), make your desired changes to the game server settings. Some good ones are:server_name- appears in the title bar of the default client, and possibly somewhere in RSC+.server_name_welcome- appears after "Welcome to" in the login screen. Put your server name here.welcome_text- appears below the "Welcome to" line of the login screen.game_tick- to make the game faster or slower.member_world,can_feature_membs- set these to false if you want a F2P experience.combat_exp_rate,skilling_exp_rate- if you want to change EXP rates.- ... plus a LOT more. Take a good long look at your
.conffile, you're bound to find something fun to try out!
- It is recommended to make a copy of a premade


Troubleshooting
- If you have it installed, make sure Docker is not running. It looks like this:

- Sometimes
ant-compile-and-runwill not work because an OpenJDK or Java process is still running. Kill any OpenJDK processes you see (i.e. in Task Manager if using Windows) and try again. Another good option is to actually launch theStart-Windows.cmdfile (or equivalent for your OS), enter option 1, let the client fail to load, then in the command prompt/terminal window that says "Starting up the server and launching the client... Press any key to continue", press any key and the terminal will kill any running Java processes it finds. If all else fails, try restarting your computer. - If the client does not start, the error in the client terminal is not always helpful. Check the server terminal (the terminal you compiled the server in with Ant) and scroll down all the way. There should be some kind of error here (if the server had started successfully, you would see
Runescape started in XXXXms). Once you find the error, post it in the #setup-help channel of the Open RSC discord. Regardless of what the error is, you can try the following:- Restart your computer. When it finishes starting back up, make sure to quit Docker (if you have it).
- Sometimes (although it's rare), errors can happen because of changes you make to the codebase. Try undoing all pending changes in the code repository (see commands below). CAUTION: If you are using SQLite, this will delete ALL data from the portable database. In a terminal pointed to your
Core-Frameworkfolder, run the following commands:git resetgit checkout -- .- If this fails with "Unlink of file '…preservation.db' failed. Should I try again? (y/n)", go into Task Manager and kill any OpenJDK processes. This may permanently delete all character data.
git clean -f -d- Do a
git status, and make sure that no file names appear. - Finally, stop any running Ant terminals and re-compile the server and client using the previous instructions in the Setting Up a Server section.
- If you still are encountering issues after this, I suggest you first try the setup on another PC or VM (ideally a new/clean one).
- If you get
Unrecognized login codetrying to log in, just try logging in again, it will work the 2nd time. This happens because the connection to the SQL database is sleeping, and usually would only happen once, for one person, every once in a while if the server did not have a lot of activity. One potential solution to this is to configure the MariaDB SQL server to not sleep.
Hosting a Server
Now that your server is running, let's make it available to other players. Most server owners host their server from their own PCs (ideally one that you do not need to use actively / restart often). You could also look into using a dedicated hosting service like a VPS (RamNode, for example), but it would probably need at least 1-2 GB of RAM, which will cost $5-10/month. If you want to host this from your own PC, the magic is Port Forwarding. Read on.
Port Forwarding
If you want to host the server from your own PC, you will first need to make sure you have a router you can log into to configure port forwarding. Some routers do not offer a way for you to log into the router and configure such things, so you may need to buy a better router online. Assuming you already have a router that lets you log into it and configure port forwarding, you’ll want to look online for instructions on setting that up (search by your router’s model name). Every router is a bit different. For example, for an Archer A7 router, the instructions would be:
- Set up IP address reservation (which is basically creating a static or reserved IP address).
- Create a new “virtual server” under NAT Forwarding, which essentially handles the port forwarding. See the table below for the settings I used. (Note, if you did not build your server off of preservation, your port will be different – check your
.conffile.)
| Field | Value |
|---|---|
| Service Type | RSC (or anything you want) |
| External Port | 43594 |
| Internal IP | The IP you reserved in Step 1 above |
| Internal Port | 43594 |
| Protocol | TCP |
Update the IP & Re-Compile
Once port forwarding is completed, update the Core-Framework/Client_Base/Cache/ip.txt file to reflect your PC’s public IP address, then re-compile the server and client.
Distribute the Client (or Connect using RSC+)
You now have two options. You can either upload/share the compiled Core-Framework/Client_Base/Open_RSC_Client.jar file with others, or have them connect via the RSC+ client. See below for detailed instructions for RSC+.
RSC+ World Config
You connect to your server through RSC+ by adding a new world.
- Open RSC+ and open Options (i.e. CTRL + O on Windows). A settings window should appear.
- Click World List. You should see at least one world here.
- Click Add New World and name it appropriately.
- For URL, enter your PC’s public IP (i.e. same IP you entered in the
ip.txtfile). - For RSA Public Key, you can find that in the terminal that you compiled the server in, near the bottom. Look for
RSA modulus. It should look like a long string of numbers. - For RSA Exponent, enter the
RSA exponentvalue from the same server terminal (usually just above the public key/modulus). - For port, enter
43594for a preservation server, or check your.conffile. - If your server should be F2P only, you can choose Free from the dropdown, which hides some members only menu elements like sound effects and duel options.
- Click Apply and then OK.
- For URL, enter your PC’s public IP (i.e. same IP you entered in the
- You should be able to log into your server now.
- Navigate to your RSC+ folder (where you installed it). You should see a
worldsfolder in here. Open it, and you should see the new world you created as an.inifile here. Share this file with other players, instructing them to put it in their worlds folder too, and they will be able to connect via RSC+. See this video for more details: https://www.youtube.com/watch?v=a4aD-PL6WK0
Appendix
Known Gotchas
- Unless you add sleep images, the server will display "asleep" as the only sleep word. We don't have authentic sleep image generation / word lists and instead use these generated images from RSC+ replays on production: https://github.com/open-rsc/rsc-captcha-archives
Place PNG images into core/server/conf/server/data/sleepwords/
- MySQL 5.7 and below (released 2015) lacks the ability to use if exists within SQL queries. Version 8, released in 2018, contains this and works fine. Same with MariaDB. If you do not use current versions of MySQL or MariaDB, importing the game server SQL database will result in an error.
- The server must be running when the client is launched as the client needs to download the config from the server to configure what features it should use. Right now it does not retry if it cannot immediately connect to the game server and will crash if one is not available.
- New installs with Docker require this set, otherwise Ubuntu's UFW can't block Docker MariaDB containers from external communication and thus bruteforce attempts: https://www.techrepublic.com/article/how-to-fix-the-docker-and-ufw-security-flaw/
       sudo nano /etc/default/docker
       DOCKER_OPTS="--iptables=false"
- The YAML parser for connection.conf uses # for inline comments. If a SQL connection password includes that character, it will not work properly.
Apache Ant is used to compile the Java files.
To set a user as an administrator, update the openrsc_players table entry for the desired player and set group_id = 0. To return them to a regular player, set them to group_id = 10.
Connecting the client to the game server
The game client reads the contents of Cache/ip.txt and Cache/port.txt to determine what game server to connect to and fetch the configuration from.
PC game launcher and updater function
The PC launcher always replaces the contents of the Cache folder with the official website versions that it is configured to connect to if they do not match. The PC Launcher module relies on multiple things, such as checking a file on GitHub (GitLab does not let Java connect over HTTPS unless user-agent is added and will return HTTP 403 Forbidden but GitHub is friendly) for the launcher version, Cache folder and md5 generated text files within in the website downloads folder that a shell script is used under Deployment_Scripts to write, and will overwrite the contents of the locally downloaded Cache/ip.txt and Cache/port.txt at every launch when it checks for a md5 comparison and downloads.
Running a single game server
Simply copy a desired premade server/*.conf file, edit as desired, then rename it as local.conf. If local.conf exists, that file will always override default.conf. No edits to build.xml are needed for normal operation.
It is possible to execute multiple game servers within the same system process by editing server/build.xml
       <target name="runserver">
       <java classname="com.openrsc.server.Server" fork="true">
           <arg value="default.conf"/>
with
       <target name="runserver">
       <java classname="com.openrsc.server.Server" fork="true">
           <arg value="openrsc.conf"/>
           <arg value="rsccabbage.conf"/>
For some reason, ordering rsccabbage.conf before openrsc.conf results in errors from experience. Note: delete local.conf before trying to use multiple presets at once or it will conflict.
Setting the stage of a quest ID in the database to -1 will mark it as complete for the player.
Editing the database for a logged in player will result in it not saving as when they log out, it will be overwritten.
Several config parameters to be aware of
Prevents login to server unless client Config has
public static final int CLIENT_VERSION = 4;
matching
<entry key = "client_version">4</entry>
Client has this but it may not affect anything since client doesn't download cache updates inside it anymore
private static final int CACHE_VERSION = 4;
Only on android does this matter but I like both android and pc client Config to be near-identical
public static final int ANDROID_CLIENT_VERSION = 45;
web server /downloads/android_version.txt
45
android client version triggers prompt to download and install updated APK
Launcher Constants determines if the launcher jar should be entirely re-downloaded
public static final Double VERSION_NUMBER = 20190713.203000;
Production game server crontab
0 */1 * * * make -C /opt/Game backup db=openrsc 0 */1 * * * make -C /opt/Game backup db=cabbage 0 */24 * * * make -C /opt/Game backup db=wiki 0 23 * * * make -C /opt/Game clear-backups days=7 1 */1 * * * cp -Rf /opt/Game/server/avatars /opt/Website && chmod -R 777 /opt/Website/avatars
- /30 * * * * python3 /opt/cloudflare-ddns/cloudflare-ddns.py -z runescapeclassic.dev
@reboot make -C /opt/Website restart @reboot make -C /opt/Game restart @reboot make -C /opt/Game run-server
Cloudflare dynamic DNS python script configuration
https://github.com/adrienbrignon/cloudflare-ddns
       sudo nano /opt/cloudflare-ddns/zones/runescapeclassic.dev.yml
       %YAML 1.1
       # Cloudflare DDNS example configuration
       ---
       # Your Cloudflare email address
       cf_email: '[email protected]'
       # Your Cloudflare API key
       # https://support.cloudflare.com/hc/en-us/articles/200167836-Where-do-I-find-my-Cloudflare-API-key
       cf_api_key: REMOVED
       # Cloudflare zone name
       # If you're updating 'ddns.example.com' set this to 'example.com'
       cf_zone: openrsc.com
       # List of records
       # If you're updating 'example.com' record, set its name to '@'.
       # Only write the subdomain ('ddns' for 'ddns.example.com')
       cf_records:
           - '@':
               type: A
               proxied: false
               log: ERROR
           - '@':
               type: AAAA
               proxid: false
               log: ERROR
       # This is the method used to discover the server's IP address
       cf_resolving_method: 'http'
Building and running in a dev environment
An IntelliJ IDEA project has been included in the Game repository folder for the server, client, and launcher. Similarly, an Android Studio project has been included for the Android client.
One option for compiling and running the server and client is to use the Apache Ant build.xml files under each folder directory. Alternatively, more quick options can be set up in the IntelliJ IDEA as shown below.


Anonymizing player data for database sharing
If during the process of development, it is desired to share the database with developers for testing purposes, the following SQL queries are suggested for anonymizing all player data to ensure privacy and security in the event the database is shared externally. The password hash and salt combination result in all players having the password "test".
       TRUNCATE `chat_logs`;
       TRUNCATE `droplogs`;
       TRUNCATE `expired_auctions`;
       TRUNCATE `friends`;
       TRUNCATE `ignores`;
       TRUNCATE `live_feeds`;
       TRUNCATE `logins`;
       TRUNCATE `game_reports`;
       TRUNCATE `player_change_recovery`;
       TRUNCATE `player_contact_details`;
       TRUNCATE `player_recovery`;
       TRUNCATE `player_security_changes`;
       TRUNCATE `private_message_logs`;
       TRUNCATE `recovery_attempts`;
       TRUNCATE `recovery_questions`;
       TRUNCATE `staff_logs`;
       TRUNCATE `trade_logs`;
       TRUNCATE `generic_logs`;
       TRUNCATE `npckills`;

       UPDATE `openrsc_players` set pass = '$2y$10$PxPZ.MWFY2S/qpbHGOAOZO6BwHdMbLOKO.gcLAqW.jg..2uglneL6';
       UPDATE `openrsc_players` set salt = 'JaQbN"a5J%OL7"K!I3Zy£#I;G}cKaT';
       UPDATE `openrsc_players` set email = ;
       UPDATE `openrsc_players` set creation_date = '0';
       UPDATE `openrsc_players` set login_ip = '0';
       UPDATE `openrsc_players` SET `creation_date` = '1587918361', `login_date` = '1587918361'
Need more help?
Contact developers on Discord in the #setup-help channel: https://discord.gg/ABdFCqn